Copyright and Attribution
Discover the joy of crafting with our free Disney Lillo pattern from Lilo and Stitch Disney movie, perfect for fans of this beloved character. This enchanting amigurumi design, along with a delightful amigurumi bear sourced from a Portuguese forum, is ideal for both beginners and experienced crocheters. Our Disney Stitch pattern guides you through the creation of charming crochet dolls, making it perfect for expanding your crochet skills or creating unique gifts. Please note that these patterns are translated and provided with permission from the original creators, ensuring proper copyright and attribution.

Materials Needed for Your Lilo and Stitch Amigurumi
Materials for Lilo:
- Crochet hook 2mm
- Black eyes 8mm
- Tapestry needle
- Scissors and universal glue
- Pins
- Stuffing fiber
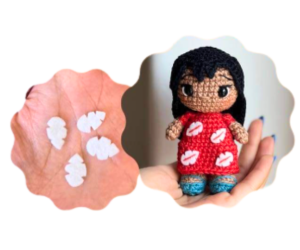
- White felt
- Thin threads for embroidery, black and white
- Red fabric pen
Materials for Scrump:
- Crochet hook 2mm
- Black and dark blue felt
- Fine point tapestry needle
- Scissors and universal glue
- Pins
- Stuffing fiber
- Thin threads for embroidery, yellow, green, red, and black
Threads and colors used: (Feel free to use threads and colors of your preference)
- Amigurumi Cherry
- Amigurumi Black
- Amigurumi Chestnut
- Amigurumi Neptune
- Amigurumi Neo Mint
- Amigurumi Tulip
- Amigurumi Mustard
Abbreviations
- ch: Chain
- sc: Single crochet
- sl st: Slip stitch
- inc: Increase
- dec: Decrease
- BLO: Back loop only
Legs and Body
Legs (Make 2):
- With BLUE color:
- Rnd 1: Ch 6, starting from the 2nd ch, work 4 sc, 1 inc, on the other side of the ch, 3 sc, 1 inc [12]
- Rnd 2: 1 inc, 3 sc, 1 inc, 1 sc, 1 inc, 4 sc, 1 inc [16]
- Rnd 3: In BLO: 16 sc [16]
- Switch to BROWN color:
- Rnd 4: In BLO: 16 sl st [16] *Try to make the sl st looser.
- Rnd 5: In BLO: 16 sc [16]
- Rnd 6: 2 sc, 6 dec, 2 sc [10]
- Rnd 7-8: 10 sc [10] – 2 rounds
- Switch to WHITE color:
- Rnd 9: 10 sc [10]
- Finish off the first leg. Do not finish off the other leg.
Sandal Finishing:
- To make the sole more concave, use a tapestry needle to pass a BLUE thread through 1 st in the middle of the sole and pull to make the sole “sink in.” Tie a knot. The base of the feet will be straighter.
- With a tapestry needle and BLUE thread, exit between rounds 3 and 4 and embroider a line to make the sandal strap. I made it with 6 sts apart.
Body:
- Continue on the 2nd leg, make 4 more sc (or the necessary amount to be positioned on the inner side), ch 3, and with the legs turned away from you, attach with 1 sc on the 1st leg. This will be the 1st st of round 10. Place the marker.
- Rnd 10: 10 sc on the 1st leg, 3 sc on the ch, 10 sc on the other leg, 3 sc on the ch [26]
- Rnd 11: 26 sc [26]
Switch to RED color:
- Rnd 12: In BLO: 26 sl st [26]
- Rnd 13: In BLO: 26 sc [26]
- Rnd 14: 5 sc, 1 dec, 11 sc, 1 dec, 6 sc [24]
- Rnd 15: 4 sc, 1 dec, 10 sc, 1 dec, 6 sc [22]
- Rnd 16: 3 sc, 1 dec, 9 sc, 1 dec, 6 sc [20]
- Rnd 17: 2 sc, 1 dec, 8 sc, 1 dec, 6 sc [18]
- Rnd 18: (1 sc, 1 dec) x6 [12]
Head:
- Switch to BROWN color:
- Rnd 19: In BLO: 12 sl st [12]
- Rnd 20: In BLO: 12 sc [12]
- Rnd 21: 12 inc [24]
- Rnd 22: (3 sc, 1 inc) x6 [30]
- Rnd 23: 2 sc, 1 inc, (4 sc, 1 inc) x5, 2 sc [36]
- Rnd 24-30: 36 sc [36] – 7 rounds
Finishing:
- Place the eyes between rounds 26 and 27 with 7 sts apart when positioned with pins and 5 visible sts apart with the eyes inserted. Embroider the nose, eyes, and eyebrows as preferred.
- Rnd 31: 2 sc, 1 dec, (4 sc, 1 dec) x5, 2 sc [30]
- Rnd 32: (3 sc, 1 dec) x6 [24]
- Rnd 33: 1 sc, 1 dec, (2 sc, 1 dec) x5, 1 sc [18]
- Rnd 34: (1 sc, 1 dec) x6 [12]
- Rnd 35: 6 dec [6]
Close with an invisible finish and hide the thread.
Dress (Skirt)
With RED color:
- With the doll turned upside down and facing away from you, insert a new thread in the front loop of round 12 and make:
- Rnd 1-6: 26 sc [26] – 6 rounds
Finish with 1 sl st, cut the thread, and make an invisible finish.
Arms (Make 2)
- Do not add stuffing.
- Start with BROWN color:
- Rnd 1: 6 sc in AM [6]
- Rnd 2-4: 6 sc [6] – 3 rounds
Switch to RED color:
- Rnd 5: In BLO: 6 sl st [6]
- Rnd 6: In BLO: 6 sc [6]
Flatten the arm and close by joining both sides with 3 sc. Finish leaving a thread for sewing. Sew to the sides of the body between rounds 17 and 18.
Dress Leaves
- Draw the leaves on white felt and cut them to the desired size. You can embroider the middle with a red thread or use a fabric pen. I preferred to make and glue the leaves only after adding the hair.
Hair
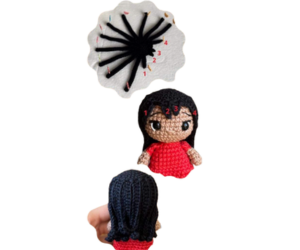
With BLACK color:
- Rnd 1: 6 sc in AM [6]
- Rnd 2: 6 inc [12]
- Rnd 3: (1 sc, 1 inc) x6 [18]
- Rnd 4: 1 sc, 1 inc, (2 sc, 1 inc) x5, 1 sc [24]
- Rnd 5: (3 sc, 1 inc) x6 [30]
- Make 1 sl st. Now we’ll make the strands:
Strands:
- Make 23 ch, turn starting from the 3rd ch, make 21 hdc, skip 1 base st and attach to the next st with 1 sl st. Repeat the process until you have a total of 10 strands.
Fringes:
- Fringe 1: Make 9 ch, starting from the 2nd ch, turn making 1 sl st, 1 sc, 2 hdc, 2 dc, 2 hdc [8] and attach to the next base st with 1 sl st.
- Fringe 2: Make 2 sc in the base sts, chain 5 and starting from the 2nd ch, turn making 1 sl st, 1 sc, 1 dc, 1 hdc [4]. Skip 1 base st and attach with 1 sl st to the next.
- Fringe 3: Make 4 ch, starting from the 2nd ch, turn making 1 sl st, 2 hdc [3]. Skip 1 base st and attach with 1 sl st to the next.
- Fringe 4: Make 2 sc in the base sts, chain 9, starting from the 2nd ch, turn making 1 sl st, 1 sc, 2 hdc, 2 dc, 2 hdc [8] and attach to the next base st with 1 sl st.
Cut the thread and finish or, if sewing, leave a thread for sewing. Position on the head with pins, glue the base and strands.
Tip: To make Lilo’s hair look more like the character’s, you can use the BLOCKING technique, which involves positioning the strands stretched and pinned on a styrofoam, spraying water or steam over the entire piece, letting it dry, and it’s ready. (:
Scrump
Arms (Make 2)
- No stuffing needed.
- Rnd 1: 5 sc in AM [5]
- Rnd 2-3: 5 sc [5] – 2 rounds
- Flatten the arm and close by joining both sides with 2 sc. Cut the thread and finish off.
Legs and Body
With GREEN color:
- Rnd 1: 5 sc in AM [5]
- Rnd 2: 5 sc [5]
- Finish off the first leg. Do not finish off the other leg. Chain 2 and attach to the first leg with 1 sc. This will be the 1st stitch of the next round.
- Rnd 3: 5 sc on the leg, 2 sc on the chains, 5 sc on the other leg, 2 sc on the chains [14]
- Rnd 4: 14 sc [14]
- Rnd 5: 2 sc, 1 dec, 5 sc, 1 dec, 3 sc [12]
- Rnd 6: 1 sc, 1 dec, 4 sc, 1 dec, 3 sc [10]
- In the next round, attach the arms while crocheting:
- Rnd 7: 1 sc, 2 sc joining the 1st arm, 3 sc, 2 sc joining the 2nd arm, 2 sc [10]
- Add stuffing as you crochet. Begin the head:
- Rnd 8: 10 inc [20]
- Rnd 9: 2 sc, 1 inc, (4 sc, 1 inc) x3, 2 sc [24]
- Rnd 10: (5 sc, 1 inc) x4 [28]
- Rnd 11: 7 sc, 1 inc, 12 sc, 1 inc, 7 sc [30]
- Rnd 12: 30 sc [30]
- Rnd 13: (3 sc, 1 dec) x6 [24]
- Rnd 14: 1 sc, 1 dec, (2 sc, 1 dec) x5, 1 sc [18]
- Rnd 15: (1 sc, 1 dec) x6 [12]
- Rnd 16: 6 dec [6]
- Close with an inverted magic ring and hide the thread.
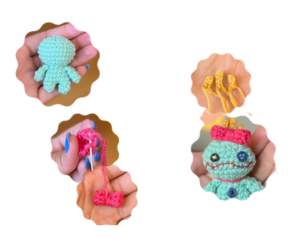
Bow
Working in flat crochet. With PINK color:
- Row 1: 3 ch, starting from the 2nd ch, turn and make 2 sc, chain 1 and turn [2]
- Row 2-12: 2 sc, chain 1 and turn [2] – 11 rows
- Row 13: 2 sc [2]
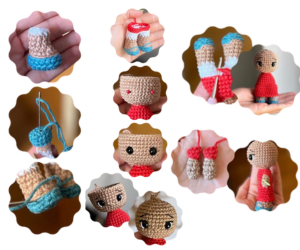
- Cut the thread leaving it long enough to join the two ends and wrap around the middle of the bow. Sew the two ends as shown in the photo. Wrap the thread several times around the middle of the bow and tighten well. Sew to the top of the head.
Hair
There will be 2 smaller strands and 1 larger strand. With MUSTARD color:
- Smaller Strand: 4 ch, turn starting from the 2nd ch and make 3 sl st [3]
- Larger Strand: 5 ch, turn starting from the 2nd ch and make 4 sl st [4]
- Cut the thread leaving it long for sewing. Sew them behind the bow.
Finishing Touches
- Cut the black and blue felt into the shape and size for the eyes and “belly button.” Glue them and make the embroidery with a fine-tipped tapestry needle and thin threads (yellow for the smaller eye and green for the larger one, see the photo and use references for guidance).
- Embroider the mouth with black thread horizontally and then make small vertical stitches with red thread.
- Make a “necklace” with pink thread.
Explore More Free Patterns:
Looking for more crochet inspiration? Visit our Free Patterns Page to discover a wide variety of crochet designs. Whether you’re a beginner or an advanced crocheter, you’ll find patterns that suit your skill level and spark your creativity. Dive into our collection and start crafting your next masterpiece today!