Rhino Crochet Pattern
Copyright and Attribution
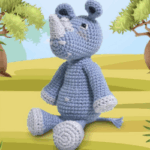
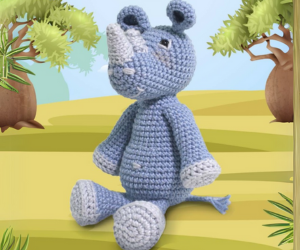
Welcome to the enchanting world of crochet, where creativity and craftsmanship come together to create delightful amigurumi. Today, we are thrilled to present the Rhino Crochet Pattern, designed by the talented artisan Andreia Miano. This pattern allows you to craft your very own lilac hippo, a charming addition to any crochet collection. As you dive into this project, you’ll find detailed instructions and helpful tips to guide you through each step. Whether you’re a seasoned crocheter or a beginner, this Rhino crochet pattern is sure to inspire and delight. Let’s embark on this creative journey and bring your lilac Rhino to life!
Craftswoman: Andreia Miano
Materials:
- 1 skein of Amigurumi – Colors: Glacial (light gray) and Aquarium (light blue)
- Safety eyes – 7mm
- Crochet hook – 3mm
- Sewing needle
- Stuffing
Stitches Used:
- Stitch = St
- Chain = Ch
- Slip Stitch = Sl St
- Single Crochet = Sc
- Half Double Crochet = Hdc
- Double Crochet = Dc
- Treble Crochet = Tr
- Increase = Inc
- Decrease = Dec

Head
With Aquarium (light blue) yarn
- Round 1: 6 Sc in a magic ring.
- Round 2: 6 Inc = 12 Sc
- Round 3: 1 Sc, 1 Inc = 18 Sc
- Round 4: 2 Sc, 1 Inc = 24 Sc
- Rounds 5 to 9: 24 Sc
- Round 10: 3 Inc, 21 Sc = 27 Sc
- Round 11: 1 Sc, 1 Inc (3x), 21 Sc = 30 Sc
- Round 12: 2 Sc, 1 Inc (3x), 21 Sc = 33 Sc
- Round 13: 3 Sc, 1 Inc (3x), 21 Sc = 36 Sc
- Rounds 14 to 17: 36 Sc
Place the safety eyes between rounds 12 and 13 with 6 stitches apart.
- Round 18: 3 Sc, 1 Dec (3x), 21 Sc = 33 Sc
- Round 19: 33 Sc
- Round 20: 2 Sc, 1 Dec (3x), 21 Sc = 30 Sc
- Round 21: 3 Sc, 1 Dec = 24 Sc
Add stuffing.
- Round 22: 2 Sc, 1 Dec = 18 Sc
- Round 23: 1 Sc, 1 Dec = 12 Sc
- Round 24: 6 Dec = 6 Sc
Finish off with a false magic ring.
Body
With Aquarium (light blue) yarn
- Round 1: 6 Sc in a magic ring.
- Round 2: 6 Inc = 12 Sc
- Round 3: 1 Sc, 1 Inc = 18 Sc
- Round 4: 2 Sc, 1 Inc = 24 Sc
- Round 5: 4 Sc, 1 Inc = 30 Sc
- Round 6: 5 Sc, 1 Inc = 36 Sc
- Rounds 7 and 8: 36 Sc
- Round 9: 5 Sc, 1 Inc = 42 Sc
- Rounds 10 and 11: 42 Sc
- Round 12: 5 Sc, 1 Dec = 36 Sc
Ears (2x)
With Aquarium (light blue) yarn
- Round 1: 6 Sc in a magic ring.
- Round 2: 6 Inc = 12 Sc
- Round 3: 1 Sc, 1 Inc = 18 Sc
- Round 4: 18 Sc
Fold a piece and secure with a few stitches. This will be the bottom part of the ear. Cut the yarn leaving a tail for sewing.
Arm (2x)
With Glacial (light gray) yarn
- Round 1: 6 Sc in a magic ring.
- Round 2: 6 Inc = 12 Sc
- Round 3: 1 Sc, 1 Inc = 18 Sc
- Round 4: 18 Sc
- Round 5: 18 Sc working in back loops only.
- Round 6: 18 Sc
Switch to Aquarium (light blue) yarn:
7. Round 7: 1 Sc, 1 Dec = 12 Sc
Leg (2x)
With Glacial (light gray) yarn
- Round 1: 6 Sc in a magic ring.
- Round 2: 6 Inc = 12 Sc
- Round 3: 1 Sc, 1 Inc = 18 Sc
- Round 4: 18 Sc
- Round 5: 18 Sc working in back loops only.
- Round 6: 18 Sc
Add stuffing halfway and cut the yarn leaving a tail for sewing.
Large Horn
With Glacial (light gray) yarn
- Round 1: 6 Sc in a magic ring.
- Round 2: 6 Inc = 12 Sc
- Round 3: 1 Sc, 1 Inc = 18 Sc
- Round 4: 18 Sc
- Round 5: 18 Sc
Cut the yarn leaving a tail for sewing.
Small Horn
With Glacial (light gray) yarn
- Round 1: 6 Sc in a magic ring.
- Round 2: 6 Inc = 12 Sc
- Round 3: 1 Sc, 1 Inc = 18 Sc
Tail
With Glacial (light gray) yarn
Make an I-cord with 3 stitches for 11 rounds.
Cut 3 pieces of yarn about 10 cm long and attach to the end of the tail.
Assembly:
- Position the head on the body and sew.
- Position the arms two rounds below the neck seam and sew.
- Position the legs on the fifth round under the body and forward from the center of the body and sew.
- Position the ears between rounds 16 and 17 with 6 stitches apart.
- Position the large horn between rounds 2 and 4 and sew.
- Position the small horn between rounds 6 and 8 and sew.
- With Glacial (light gray) yarn, embroider the teeth below the large horn between rounds 2 and 3.
- Embroider the mouth with Glacial (light gray) yarn below the teeth between rounds 5 and 6 and make a side smile.
- Make two lines next to the eyes, one below and another on the side of the eye with Glacial (light gray) yarn.
- Embroider the rhino’s belly button between rounds 12 and 13 with Glacial (light gray) yarn.
- Attach the tail to the back of the body.
- If desired, apply blush to the cheeks.
Explore More Free Patterns:
Looking for more crochet inspiration? Visit our Free Patterns Page to discover a wide variety of crochet designs. Whether you’re a beginner or an advanced crocheter, you’ll find patterns that suit your skill level and spark your creativity. Dive into our collection and start crafting your next masterpiece today!