Copyright and Attribution
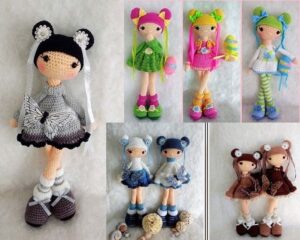
Discover the joy of crafting with our free crochet doll patterns, including a delightful amigurumi bear sourced from a Portuguese forum. These patterns are perfect for both beginners and experienced crocheters, guiding you through the creation of charming crochet dolls. Ideal for those looking to expand their crochet skills or create unique gifts, our free crochet doll patterns bring creativity and fun to your crafting journey.
Materials Needed:
- Yarn in colors: black, silver, gray, white, and skin tone
- Crochet hook size 2 mm
- Tapestry needle
- Scissors
- Safety eyes 9 mm
- Blush for cheeks
- Accessories for decorating the doll

Abbreviations Legend:
- Ch – Chain: A foundational stitch used to begin most crochet projects.
- St(s) – Stitch(es): Refers to the individual loops on the crochet piece.
- Slst – Slip stitch: A stitch used to join or finish off a round or row.
- Sc – Single crochet: A basic crochet stitch.
- Hdc – Half double crochet: A stitch between single and double crochet in height.
- Dc – Double crochet: A taller stitch than single crochet.
- Dtr – Double treble crochet: A very tall stitch.
- Inc – Increase: Adding stitches.
- Dec – Decrease: Reducing stitches.
Step-by-Step Guides to Crochet Dolls: Free Patterns and Tips
Shoes – Make Two
Start with black yarn.
- Round 1: Ch 10, starting from the second Ch from hook: 8 Sc, 4 Sc in last Ch, on the other side: 7 Sc, 3 Sc in last Ch = 22 Sts.
- Round 2: 1 Inc, 1 Sc, 1 Inc, 5 Sc, 1 Inc, 1 Sc, 2 Inc, 1 Sc, 1 Inc, 5 Sc, 1 Inc, 1 Sc, 1 Inc = 30 Sts.
- Round 3: 22 Inc, 2 Sc, 1 Inc, 6 Sc, 1 Inc, 2 Sc, 3 Inc, 2 Sc, 1 Inc, 6 Sc, 1 Inc, 2 Sc, 1 Inc = 40 Sts.
- Round 4: 4 Sc, 1 Inc, 15 Sc, 2 Inc, 13 Sc, 1 Inc, 4 Sc = 44 Sts.
- Round 5: 44 Sc working in back loops only. Change to gray yarn.
- Rounds 6-8: 44 Sc
- Round 9: 15 Sc, 6 Dec, 11 Sc = 38 Sts.
- Round 10: 38 Sc
- Round 11: 12 Sc, 6 Dec, 8 Sc = 32 Sts.
- Round 12: 32 Sc
- Round 13: 10 Sc, 8 Dec, 6 Sc = 24 Sts.
- Round 14: 24 Sc
- Round 15: 6x (2 Sc, 1 Dec) = 18 Sts.
- Round 16: 18 Sc
- Round 17: Make 4 Sc in gray (to change color at the center of the heel), switch to white: 14 Sc = 18 Sts.
- Rounds 18-20: 18 Hdc
- Round 21: 6x (2 Hdc, 1 Inc of Hdc) = 24 Sts.
- Round 22: 24 Hdc
- Round 23: 23 Hdc, 1 Sc, 1 Slst to finish off. Leave a long tail for sewing.
Stuff the shoes up to the white part. Make the second shoe in the same way.
Legs – Make Two
Start with silver yarn for the sock.
- Magic Ring: Create a magic ring with 6 Sc.
- Round 1: 6 Inc = 12 Sts.
- Rounds 2-7: 12 Sc
Switch to white yarn.
- Rounds 8-9: 12 Sc
Switch to silver yarn.
- Rounds 10-11: 12 Sc
Switch to white yarn.
- Rounds 12-13: 12 Sc
Switch to skin tone yarn.
- Rounds 14-41: 12 Sc
Switch to silver yarn.
- Rounds 42-44: 12 Sc
- Round 45: 3x (3 Sc, 1 Inc) = 15 Sts.
Add stuffing up to about 2.5 cm above the last white row of the sock. This way, the upper part of the leg will not be filled, allowing it to sit well on a shelf, niche, window, or similar.
Finish the first leg and fasten off; do not fasten off the second leg.
To Join the Legs:
- Ch 3 and attach to the first leg, making 15 Sc.
- Ch 3 and attach to the second leg, making 15 Sc = 36 Sts.
Body
- Rounds 1-12: 36 Sc
- Round 13: Continue with a few more Sc until you reach the middle of the back, switch to white yarn and make 36 Sc.
- Round 14: Switch to silver yarn and work in back loops only: 5 Sc, 1 Dec, 2 Sc, 1 Dec, 12 Sc, 1 Dec, 2 Sc, 1 Dec, 7 Sc = 32 Sts.
- Round 15: 6 Sc, 1 Dec, 16 Sc, 1 Dec, 6 Sc = 30 Sts
- Round 16: 7 Sc, 1 Dec, 14 Sc, 1 Dec, 5 Sc = 28 Sts
- Round 17: 7 Sc, 1 Dec, 13 Sc, 1 Dec, 4 Sc = 26 Sts
Now we’ll make the skirt, as it’s easier to do without stuffing. You can cut the yarn if you prefer, or leave it as we’ll return to the body after making the skirt.
Place the body with the opening facing you (legs pointing up) and insert the hook into the last stitch in the loops left in Round 14.
Skirt
- Round 1: Start with white yarn, make 1 Inc in each stitch, close with Slst = 72 Sts.
- From here, work in Dc, closing each round with Slst and chaining 2 to reach the height of the stitch.
- Rounds 2-3: 72 Dc
- Round 4: Switch to silver yarn: 72 Dc
- Round 5: 72 Dc
- Round 6: Switch to dark gray yarn: 72 Dc
- Round 7: 72 Dc
- Round 8: Switch to black yarn: 3 Sc in each base stitch = 216 Sts. Fasten off.
Sew the middle of the legs and add stuffing to the body gradually as you progress. Do not stuff the neck as we’ll add a “support” later. Continue crocheting the body.
- Round 18: 7 Sc, 1 Dec, 12 Sc, 1 Dec, 3 Sc = 24 Sts.
- Round 19: 7 Sc, 1 Dec, 11 Sc, 1 Dec, 2 Sc = 22 Sts.
- Round 20: 7 Sc, 1 Dec, 10 Sc, 1 Dec, 1 Sc = 20 Sts.
- Round 21: 7 Sc, 1 Dec, 9 Sc, 1 Dec, make 2 more Sc in gray and switch to skin tone yarn = 18 Sts.
- Round 22: 4 Sc, 1 Dec, 8 Sc, 1 Dec, 2 Sc = 16 Sts.
- Round 23: 4 Sc, 1 Dec, 7 Sc, 1 Dec, 1 Sc = 14 Sts.
- Round 24: 4 Sc, 1 Dec, 6 Sc, 1 Dec = 12 Sts.
- Rounds 25-28: 12 Sc
Now continue with the head. Do not fasten off the yarn; continue crocheting the head.
Head
- Round 1: 6x (1 Sc, 1 Inc) = 18 Sts.
- Round 2: 6x (2 Sc, 1 Inc) = 24 Sts.
- Round 3: 6x (3 Sc, 1 Inc) = 30 Sts.
- Round 4: 6x (4 Sc, 1 Inc) = 36 Sts.
- Round 5: 6x (5 Sc, 1 Inc) = 42 Sts.
- Round 6: 6x (6 Sc, 1 Inc) = 48 Sts.
- Rounds 7-15: 48 Sc
Place the eyes between rounds 11 and 12, spaced 8 stitches apart. When starting the decreases, you can switch to the hair color to mark where to place the hair, or continue with the skin tone if preferred.
- Round 16: 6x (6 Sc, 1 Dec) = 42 Sts.
- Round 17: 6x (5 Sc, 1 Dec) = 36 Sts.
- Round 18: 6x (4 Sc, 1 Dec) = 30 Sts.
- Round 19: 6x (3 Sc, 1 Dec) = 24 Sts.
Important!
Create the neck support before finishing and stuffing the head.
Start with skin tone yarn, making 5 Sc in a magic ring.
- Round 1: 5 Inc = 10 Sts.
- Rounds 2-14: 10 Sc
Add plenty of stuffing to ensure the neck is firm.
- Round 3: 5 Dec
Finish with a false magic ring.
Place the support in the neck, ensuring it is centered. When pressing the body, you should feel the extent of the support.
Eyes and Nose
If desired, embroider eyelashes before attaching the eyes for ease. For the nose, embroider with skin tone yarn one round below the eyes, covering 3 stitches in width over 2 stitches.
Stuff the Head
To ensure the head is round, proceed carefully. Here’s a method you can follow:
Place four fingers inside the head, from index to pinky, and gently stretch the bottom of the head. Be cautious not to stretch too much to avoid opening the stitches. Carefully push the stuffing down as much as possible. Add more stuffing to the top and repeat the process, pushing as much as possible to fill the sides of the head.
You should be able to feel the top of the neck support. Once the head is fully stuffed, you can finish closing it. You may need to add a bit more stuffing before closing with a false magic ring. Then, gently shape the head to round it further.
To Close the Head:
- Round 20: 6x (2 Sc, 1 Dec) = 18 Sts.
- Round 21: 6x (1 Sc, 1 Dec) = 12 Sts.
Finish with a false magic ring. Your doll is almost ready. You can apply blush; I use pink rouge applied with a brush.
Arms – Make Two
Start with skin tone yarn, making 5 Sc in a magic ring.
- Round 1: 5 Inc = 10 Sts.
- Rounds 2-6: 10 Sc
Switch to silver yarn and make 24 rounds of 10 Sc. Stuff the arm up to round 12 in silver; leave the rest unstuffed like the legs, allowing it to fall nicely alongside the body. Fold the arm in half after round 30 and sew with Sc. Make the second arm the same way and sew it to the last round in silver on the body.
Collar
Crochet in rows.
- Row 1: Ch 8, starting from the second Ch: 7 Sc, Ch 1, turn.
- Rows 2-22: 7 Sc
Fasten off and leave a tail for sewing. You may need to adjust the number of rows depending on your stitch tension and how firmly the body is stuffed. Fold the collar in half horizontally and sew the short edges. Place the collar around the color change from gray to skin tone on the body, with the folded side up, as the seam is tricky. Pin the middle to keep it in place.
I always press the arms against the body to make it easier to attach the collar. Sew the short edges together at the back of the body. Then sew the long edge to the body with a few stitches. Avoid pulling the stitches too tight to prevent puckering.
Arm Cuffs – Make Two
Crochet in rows.
- Row 1: Ch 8, starting from the second Ch: 7 Sc, Ch 1, turn.
- Rows 2-17: 7 Sc
Fasten off and leave a tail for sewing. You may need to adjust the number of rows depending on your stitch tension and how firmly the arm is stuffed. Fold the cuff in half horizontally and sew the short edges. Place the cuff around the color change on the arm with the folded side down, as the seam is tricky. Pin the middle to keep it in place. Sew the short edges together at the back of the arm. Then sew the long edge with a few stitches. Avoid pulling the stitches too tight to prevent puckering.
Leg Warmers – Make Two
Crochet in rows.
- Row 1: Ch 8, starting from the second Ch: 7 Sc, Ch 1, turn.
- Rows 2-19: 7 Sc
Fasten off and leave a tail for sewing. You may need to adjust the number of rows depending on your stitch tension and how firmly the legs are stuffed. Fold the leg warmer in half horizontally and sew the short edges. Place the leg warmer around the color change on the leg with the folded side down, as the seam is tricky. Pin the middle to keep it in place. Sew the short edges together at the back of the leg. Then sew the long edge with a few stitches. Avoid pulling the stitches too tight to prevent puckering.
Shoes
Lift the edge of the shoe, place the leg inside, ensuring the toes are facing forward. Sew all around without pulling too tight. Repeat for the other leg.
Hair – Black
Start with a magic ring with 6 Sc.
- Round 1: 6 Inc = 12 Sts.
- Round 2: 6x (1 Sc, 1 Inc) = 18 Sts.
- Round 3: 6x (2 Sc, 1 Inc) = 24 Sts.
- Round 4: 6x (3 Sc, 1 Inc) = 30 Sts.
- Round 5: 6x (4 Sc, 1 Inc) = 36 Sts.
- Round 6: 6x (5 Sc, 1 Inc) = 42 Sts.
- Round 7: 6x (6 Sc, 1 Inc) = 48 Sts.
- Rounds 8-17: 48 Sc
- Round 18: 48 Slst
Fasten off and leave a tail for sewing.
Buns – Make Two
Start with black yarn in a magic ring with 6 Sc.
- Round 1: 6 Inc = 12 Sts.
- Round 2: 6x (1 Sc, 1 Inc) = 18 Sts.
- Round 3: 6x (2 Sc, 1 Inc) = 24 Sts.
- Rounds 4-6: 24 Sc
- Round 7: 6x (2 Sc, 1 Dec) = 18 Sts.
Fasten off and leave a tail for sewing.
Sew the hair onto the head. Stuff the buns and sew them where desired on the head. I placed them high, between rounds 7/11 counting from the magic ring. Pin them in place to sew, ensuring they don’t move while sewing. Add more stuffing if needed before finishing the sewing. A robust bun looks more attractive.
Explore More Free Patterns:
Looking for more crochet inspiration? Visit our Free Patterns Page to discover a wide variety of crochet designs. Whether you’re a beginner or an advanced crocheter, you’ll find patterns that suit your skill level and spark your creativity. Dive into our collection and start crafting your next masterpiece today!