Copyright and Attribution
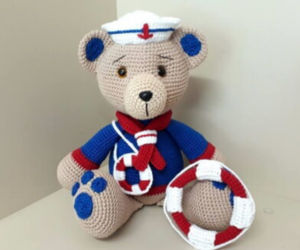
Discover the joy of crafting with our amigurumi bear crochet pattern, sourced from a Portuguese forum. This delightful pattern is perfect for both beginners and experienced crocheters, guiding you through the creation of a charming bear. Ideal for those looking to expand their crochet skills or create a unique gift, this pattern brings creativity and fun to your crafting journey.
Abbreviations Legend:
- Sc – Single crochet: A basic crochet stitch.
- Dc – Double crochet: A taller stitch than single crochet.
- Hdc – Half double crochet: A stitch between single and double crochet in height.
- St(s) – Stitch(es): Refers to the individual loops on the crochet piece.
- Sc2tog – Single crochet two together: A decrease technique that combines two stitches into one.
- Slst – Slip stitch: A stitch used to join or finish off a round or row.
- (x) – Crocheted altogether x stitches this round: Indicates the total number of stitches in a round.
- Ch – Chain: A foundational stitch used to begin most crochet projects.
Materials Needed:
- Crochet yarn in your chosen color
- Crochet hook suitable for the yarn
- Stuffing fiber
- Safety eyes (optional)

Instructions:
Sailor Bear
Head
- Round 1: Magic ring with 6 sc (6 sts)
- Round 2: 1 sc in each st (12 sts)
- Round 3: 1 sc, 1 sc2tog repeat 6 times (18 sts)
- Round 4: 1 sc, 1 sc2tog, 1 sc repeat 6 times (24 sts)
- Round 5: 3 sc, 1 sc2tog repeat 6 times (30 sts)
- Round 6: 2 sc, 1 sc2tog, 2 sc repeat 6 times (36 sts)
- Round 7: 5 sc, 1 sc2tog repeat 6 times (42 sts)
- Round 8: 3 sc, 1 sc2tog, 3 sc repeat 6 times (48 sts)
- Round 9: Sc in each st (48 sts)
- Round 10: 7 sc, 1 sc2tog repeat 6 times (54 sts)
- Round 11: 4 sc, 1 sc2tog, 4 sc repeat 6 times (60 sts)
- Round 12: Sc in each st (60 sts)
- Round 13: 9 sc, 1 sc2tog repeat 6 times (66 sts)
- Round 14: 5 sc, 1 sc2tog, 5 sc repeat 6 times (72 sts)
- Round 15: Sc in each st (72 sts)
- Round 16: 11 sc, 1 sc2tog repeat 6 times (78 sts)
- Round 17: 6 sc, 1 sc2tog, 6 sc repeat 6 times (84 sts)
- Round 18-24: Sc in each st (84 sts) (7 rounds)
- Round 25: 6 sc, 1 sc2tog, 6 sc repeat 6 times (78 sts)
- Round 26: 11 sc, 1 sc2tog repeat 6 times (72 sts)
- Round 27: 5 sc, 1 sc2tog, 5 sc repeat 6 times (66 sts)
- Round 28: 9 sc, 1 sc2tog repeat 6 times (60 sts)
- Round 29: 4 sc, 1 sc2tog, 4 sc repeat 6 times (54 sts)
- Round 30: 7 sc, 1 sc2tog repeat 6 times (48 sts)
- Round 31: 3 sc, 1 sc2tog, 3 sc repeat 6 times (42 sts)
- Round 32: 5 sc, 1 sc2tog repeat 6 times (36 sts)
- Round 33: 2 sc, 1 sc2tog, 2 sc repeat 6 times (30 sts)
- Round 34: 30 sc – working in back loops only (30 sts)
- Round 35: 30 sc – working in front loops only (30 sts)
Note: The safety eyes will be placed between rounds 16 and 17, leaving 10 stitches between them. Rounds 34 and 35 will reinforce the head during sewing, as it will be double-layered. Fasten off, leaving a long tail for sewing the head to the body.
Body
- Round 1: Magic ring with 6 sc (6 sts)
- Round 2: 1 sc in each st (12 sts)
- Round 3: 1 sc, 1 sc2tog repeat 6 times (18 sts)
- Round 4: 1 sc, 1 sc2tog, 1 sc repeat 6 times (24 sts)
- Round 5: 3 sc, 1 sc2tog repeat 6 times (30 sts)
- Round 6: 2 sc, 1 sc2tog, 2 sc repeat 6 times (36 sts)
- Round 7: 5 sc, 1 sc2tog repeat 6 times (42 sts)
- Round 8: 3 sc, 1 sc2tog, 3 sc repeat 6 times (48 sts)
- Round 9: 7 sc, 1 sc2tog repeat 6 times (54 sts)
- Round 10: 4 sc, 1 sc2tog, 4 sc repeat 6 times (60 sts)
- Round 11: 9 sc, 1 sc2tog repeat 6 times (66 sts)
- Round 12: 5 sc, 1 sc2tog, 5 sc repeat 6 times (72 sts)
- Round 13-14: Sc in each st (72 sts)
- Round 15: Change to red yarn (72 sts)
- Round 15-17: Sc in each st – red yarn (72 sts)
- Round 18: Change to blue yarn (72 sts)
- Round 18-23: Sc in each st (72 sts)
- Round 24: 5 sc, 1 sc2tog, 5 sc repeat 6 times (66 sts)
- Round 25-26: Sc in each st (66 sts)
- Round 27: 9 sc, 1 sc2tog repeat 6 times (60 sts)
- Round 28-29: Sc in each st (60 sts)
- Round 30: 4 sc, 1 sc2tog, 4 sc repeat 6 times (54 sts)
- Round 31-32: Sc in each st (54 sts)
- Round 33: 7 sc, 1 sc2tog repeat 6 times (48 sts)
- Round 34-36: Sc in each st (48 sts)
- Round 37: 3 sc, 1 sc2tog, 3 sc repeat 6 times (42 sts)
- Round 38-39: Sc in each st (42 sts)
- Round 40: 5 sc, 1 sc2tog repeat 6 times (36 sts)
- Round 41: Sc in each st (36 sts)
- Round 42: 2 sc, 1 sc2tog, 2 sc repeat 6 times (30 sts)
- Round 43: Sc in each st (30 sts)
- Round 44: 30 sc – working in back loops only (30 sts)
- Round 45: 30 sc – working in front loops only (30 sts)
Note: Rounds 44 and 45 will reinforce the body during sewing, as it will be double-layered. This ensures that when the head and body are joined, they will be very firm. Don’t forget to stuff the pieces well.
Arms
- Note: Start with beige yarn until round 12.
- Round 1: Magic ring with 6 sc (6 sts)
- Round 2: 1 sc in each st (12 sts)
- Round 3: 1 sc, 1 sc2tog repeat 6 times (18 sts)
- Round 4: 2 sc, 1 sc2tog repeat 6 times (24 sts)
- Round 5: 3 sc, 1 sc2tog repeat 6 times (30 sts)
- Round 6: 4 sc, 1 sc2tog repeat 6 times (36 sts)
- Round 7-9: Sc in each st (36 sts)
- Round 10: 10 sc, 1 sc2tog repeat 3 times (33 sts)
- Round 11-12: Sc in each st (33 sts)
Note: Change to red yarn from round 13 to 15 (3 rounds in red).
- Round 13: 9 sc, 1 sc2tog repeat 3 times (30 sts)
- Round 14: Sc in each st (30 sts)
- Round 15: 11 sc, 4 sc2tog, 11 sc (26 sts)
Note: Change to blue yarn from round 16 to the end of the arm.
- Round 16: Sc in each st (26 sts)
- Round 17: 11 sc, 2 sc2tog, 11 sc (24 sts)
- Round 18-21: Sc in each st (24 sts)
- Round 22: 6 sc, 1 sc2tog repeat 3 times (21 sts)
- Round 23-27: Sc in each st (21 sts)
- Round 28: 5 sc, 1 sc2tog repeat 3 times (18 sts)
- Round 29-33: Sc in each st (18 sts)
Note: Fasten off and leave a long tail for sewing.
Legs
- Round 1: Magic ring with 6 sc (6 sts)
- Round 2: 4 sc in first st, 2 sc, 4 sc in next st, 2 sc (12 sts)
- Round 3: 1 sc, 3 sc2tog repeat 3 times, 3 sc, 3 sc2tog repeat 3 times, 2 sc (18 sts)
- Round 4: 2 sc, 3 sc2tog repeat 3 times, 6 sc, 3 sc2tog repeat 3 times, 4 sc (24 sts)
- Round 5: 3 sc, 3 sc2tog, 1 sc repeat 3 times, 6 sc, 3 sc2tog, 1 sc repeat 3 times, 3 sc (30 sts)
- Round 6: 4 sc, 3 sc2tog, 1 sc repeat 3 times, 9 sc, 3 sc2tog, 1 sc repeat 3 times, 5 sc (36 sts)
- Round 7: 6 sc, 3 sc2tog, 2 sc repeat 3 times, 9 sc, 3 sc2tog, 2 sc repeat 3 times, 3 sc (42 sts)
- Round 8: 7 sc, 3 sc2tog, 2 sc repeat 3 times, 11 sc, 3 sc2tog, 2 sc repeat 3 times, 6 sc (48 sts)
- Round 9-12: Sc in each st (48 sts)
- Round 13: 14 sc, 1 sc2tog repeat 3 times (45 sts)
- Round 14: Sc in each st (45 sts)
- Round 15: 13 sc, 1 sc2tog repeat 3 times (42 sts)
- Round 16: 1 sc, 1 sc2tog repeat 6 times, 24 sc (36 sts)
- Round 17: Sc in each st (36 sts)
- Round 18: 2 sc, 1 sc, 1 sc2tog repeat 4 times, 22 sc (32 sts)
- Round 19: Sc in each st (32 sts)
- Round 20: 3 sc, 1 sc, 1 sc2tog repeat 2 times, 23 sc (30 sts)
- Round 21: Sc in each st (30 sts)
- Round 22: Sc in each st (30 sts)
- Round 23: 8 sc, 1 sc2tog repeat 3 times (27 sts)
- Round 24: Sc in each st (27 sts)
- Round 25: Sc in each st (27 sts)
- Round 26: 7 sc, 1 sc2tog repeat 3 times (24 sts)
- Round 27: Sc in each st (24 sts)
- Round 28: Sc in each st (24 sts)
- Round 29: 6 sc, 1 sc2tog repeat 3 times (21 sts)
- Round 30: Sc in each st (21 sts)
- Round 31: Sc in each st (21 sts)
- Round 32: Sc in each st (21 sts)
- Round 33: Sc in each st (21 sts)
- Round 34: 5 sc, 1 sc2tog repeat 3 times (18 sts)
- Round 35-36: Sc in each st (18 sts)
Ears (make 2x)
- Round 1: Magic ring with 6 sc (6 sts)
- Round 2: 1 sc in each st (12 sts)
- Round 3: 1 sc, 1 sc2tog repeat 6 times (18 sts)
- Round 4: 2 sc, 1 sc2tog repeat 6 times (24 sts)
- Round 5: 3 sc, 1 sc2tog repeat 6 times (30 sts)
- Round 6-8: Sc in each st (30 sts)
- Round 9: 3 sc, 1 sc2tog repeat 6 times (24 sts)
Foot Pads – Center Part
- Round 1: Magic ring with 6 sc (6 sts)
- Round 2: 4 sc in first st, 2 sc, 4 sc in next st, 2 sc (12 sts)
- Round 3: 1 sc, 3 sc2tog repeat 3 times, 3 sc, 3 sc2tog repeat 3 times, 2 sc (18 sts)
Paw Fingers – 3 for each paw
- Round 1: Magic ring with 10 sc (10 sts)
- Note: Finish with a slst in the first st. Fasten off and leave a long tail for sewing.
Snout
- Round 1: Magic ring with 6 sc (6 sts)
- Round 2: 1 sc in each st (12 sts)
- Round 3: 1 sc, 1 sc2tog repeat 6 times (18 sts)
- Round 4: 2 sc, 1 sc2tog repeat 6 times (24 sts)
- Round 5: 3 sc, 1 sc2tog repeat 6 times (30 sts)
- Round 6: 4 sc, 1 sc2tog repeat 6 times (36 sts)
- Round 7-10: Sc in each st (36 sts)
- Note: Embroider the nose with black yarn or use a safety nose as shown in the illustrative photo above.
Accessories
Bow Tie
- Note: Ch 76, start sc in 2nd ch.
- Round 1: 12 sc, 51 dc, 12 sc, turn work and ch 1.
- Round 2: 12 sc, 51 dc, 12 sc, turn work and ch 1.
- Round 3: 12 sc, 51 dc, 12 sc, turn work and ch 1.
- Round 4: 12 sc, 51 dc, 12 sc, finish with slst.
Bow Tie Knot
- Note: Ch 16, start sc in 2nd ch.
- Round 1-3: 15 sc, fasten off and sew the two ends to close the circle. With red yarn, make slst horizontally between the 1st and 2nd row to create the red detail on the knot.
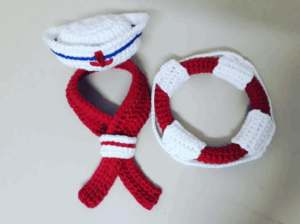
Sailor Hat
- Round 1: Magic ring with 12 dc (12 sts)
- Round 2: 1 dc in each st (24 sts)
- Round 3: 1 dc, 1 dc2tog repeat 12 times (36 sts)
- Round 4-5: Dc in each st (36 sts)
- Note: In round 6, work on the wrong side to create the brim.
- Round 6: 5 sc, 1 sc2tog repeat 6 times, working in back loops only (36 sts)
- Round 7: Sc in each st (36 sts)
- Round 8: Sc in each st, making 2 sc2tog, one on each side (36 sts)
- Round 9: Sc in each st, making 4 sc2tog, two on each side (36 sts)
- Round 10: Sc in each st, making 2 sc2tog, one on each side (36 sts), fasten off.
Note: Use the red yarn to create an anchor in the middle of the hat and blue yarn to make slst between the stitches for the blue detail, adding charm and enhancing the piece.
Large Buoy
- Round 1: Magic ring with 8 sc (8 sts)
- Note: Continue rounds with 8 sts, creating a tube until the desired size. If you want a thicker buoy, add more sts in the magic ring and continue rounds until the desired size. After reaching the desired size, fasten off and insert a thin hot glue inside for firmness. For the white parts, ch 10 and continue with sc until the 10th round, wrap around the red part and sew the ends to close the white. Ensure the spaces for the white parts are even. Between the red and white parts of the buoy, ch 26 to mimic the rope on the buoy’s side.
Small Buoy
- Note: For the small buoy, I used a small ring and made sc all around it, then wrapped white yarn for details and ch 10 between spaces to mimic the buoy’s rope.
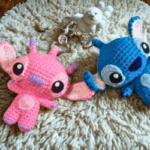
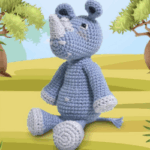
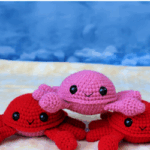
Explore More Free Patterns:
Looking for more crochet inspiration? Visit our Free Patterns Page to discover a wide variety of crochet designs. Whether you’re a beginner or an advanced crocheter, you’ll find patterns that suit your skill level and spark your creativity. Dive into our collection and start crafting your next masterpiece today!